Since I still haven't figured out the former, I'm going to write about the latter.
First things first, if you're going to get a certificate solely for signing AIR files, then buy one from Verisign or Thawte specifically for AIR. It's just easier.
If, however, you want to use your certificate to sign .NET applications as well, then get a Microsoft Authenticode certificate. You can use that certificate to sign AIR apps and well as .NET apps. We got our Authenticode certificate from Verisign, but there are other vendors. If this is what works for you, then the following might be helpful. If you have haven't already done so, go away and buy the certificate now - I'll see you again when you have downloaded a PVK file and an SPC file.
So, let's skip forward a few days. You've got your PVK file (the private key), and the SPC file. You're probably wondering how to turn those files in to a PFX file that you can use with ADT to sign files. Hopefully, these steps should help. Oh, I'm assuming that you're using a PC here...
Firstly, you need to ask yourself two questions:
- Do you feel lucky?
- Can you find a tool called pvk2pfx on your machine. This is a pain to get hold of, but lives in bin directory of most Microsoft SDKs.
I don't have pvk2pfx, I need something else
Worry not, this is still completely possible...
- Get a tool called pvkimprt. You can download it from Microsoft. Run the self extracting whatsit, then run the installer, and make a note of its final resting place.
- Open up a commmand prompt (Start, Run, "cmd").
- Change to the directory where pvkimprt ended up.
- Run:
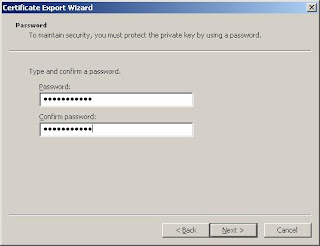
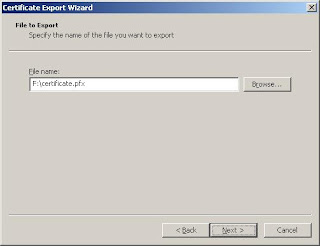
pvkimprt -PFX <path\to\cert.spc> <path\to\key.pvk> - Choose the following options:


- You can use the resulting pfx file to sign an Adobe AIR file with adt.


You're done! You might want to ignore the rest of this post, it will make you wish you were luckier. Any questions/mistakes/omissions, feel free to ask...
I'm lucky, I have pvk2pfx
This is much easier. Simply:- Open up a commmand prompt (Start, Run, "cmd")
- Change to directory where you found pvk2pfx.
- Run:
pvk2pfx -pvk <path\to\key.pvk> -pi <pvk password> -spc <path\to\cert.spc> -pfx <path\to\output.pfx> -po <new password for pfx file> (all on one line) - You can use the resulting pfx file to sign an Adobe AIR file with adt.
I hope that was helpful!

I could have really done with this a few months ago! It seems there are some great articles out there if you intend to buy a new certificate and start from scratch but many organisations already have some sort of certificate and there isn't much out there about putting the pieces togther.
ReplyDeleteThanks! saved me time and cash :)
ReplyDeleteThanks for your post. It was quite helpful. I posted another solution here (http://stackoverflow.com/questions/4506070/signing-an-adobe-air-application-with-an-spc-file/4506135#4506135) that you and your readers might want to consider in the future.
ReplyDelete